Alpine Linux encrypted UKI install
Continuing with my trend of discussing UEFI related topics, today we will be setting up Alpine Linux with encryption and a UKI.
UKI stands for Unified Kernel Image, and it is a single file that will contain our initramfs (which will include CPU microcode if applicable), kernel, kernel parameters, and our os-release information.
This gives us a single file to sign for secure boot, and provides better security compared to running a normal efistub setup with secure boot.
To begin, I assume you’ve already booted into an Alpine Linux live system via a USB flash drive, CD, or otherwise.
Modifying the Alpine installer
By default, Alpine deploys a typical bootloader, but we can set a variable in the install script to skip installing a bootloader and then chroot into the new system to configure our UKI and boot entry.
Open the /sbin/setup-disk script in a text editor such as vi and add BOOTLOADER="none" like so:
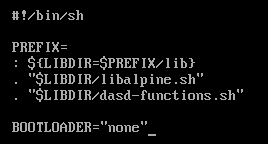
After this, save the file and continue installing Alpine Linux as you normally would, with the setup-alpine command. Be sure to configure the disk with encryption and LVM.
Mounting partitions
After installing, we need to mount the root partition to /mnt so that we can chroot into it before first boot.
On the live Alpine system, I’m going to install lsblk to get a list of disks and partitions with apk add lsblk.
After this, run lsblk to see a list of disks and partitions, in my case:
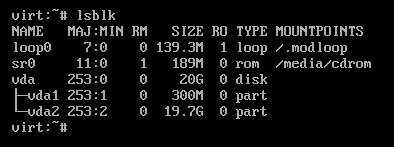
We need to unlock our new encrypted partition, to do so run cryptsetup luksOpen /dev/vda2 cryptroot, replacing /dev/vda2 with your drives encrypted partition and cryptroot with what you would like to name it, and then enter your encryption passphrase.
Next, run vgchange -ay to activate logical volumes. Then, after running lsblk again, we can see our logical volumes containing the root and swap:
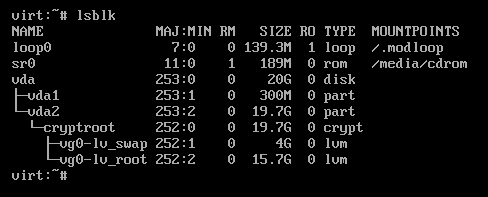
We now need to mount our lv_root to /mnt. To do so, run mount /dev/mapper/vg0-lv_root /mnt.
We also need to mount our boot partition, mount /dev/vda1 /mnt/boot in my case.
There are a few more directories that should be mounted before we do anything, condensed into a one-line command:
for dir in dev proc sys run; do mkdir -p /mnt/$dir ; mount --rbind /$dir /mnt/$dir ; mount --make-rslave /mnt/$dir ; done
After that, we can chroot into our new system with chroot /mnt and begin building our initramfs.
Building the new initramfs
If you do not want to include CPU microcode, feel free to skip this section.
Install the intel-ucode, amd-ucode, or otherwise applicable CPU microcode package with apk add cpu-ucode.
To build our new initramfs that includes our CPU microcode, run the following:
cat /boot/intel-ucode.img /boot/initramfs-lts > /tmp/initramfs-lts
Replacing intel-ucode.img as necessary (amd-ucode.img for AMD CPUs).
Kernel parameters
We need to put our kernel parameters into a file to later give our UKI. I’m going to place mine at /root/kernelparams, so run vi /root/kernelparams and begin adding kernel parameters.
Your kernel parameters should not include an initrd parameter.
I am going to include the following:
cryptroot=UUID=<UUID> cryptdm=cryptroot root=/dev/mapper/vg0-lv_root rootfstype=ext4 rw
<UUID> in the cryptroot=UUID= line should be replaced by the UUID of the encrypted root partition. One way of getting the disks UUID is by running blkid -o value -s UUID /dev/vda2 in my case, do replace /dev/vda2 according to your setup.
Replace cryptroot in the cryptdm=cryptroot line with what you would like to name this. I used cryptroot earlier when we opened our LUKS partition, and I will go with that again here.
If you are using another filesystem, such as xfs, be sure to change rootfstype=ext4 accordingly, such as to rootfstype=xfs.
If you would like a quiet output on boot, add loglevel=4 to your kernel parameters.
Save and exit this file.
Building the UKI
The necessary packages for this are binutils and gummiboot-efistub. binutils will provide objcopy, which we will be using to build our UKI, and gummiboot-efistub will provide our stub (don’t worry, only this file, not the whole bootloader). These can be installed by running apk add binutils gummiboot-efistub.
Create a script with vi build-uki.sh and give it the following contents:
#!/bin/sh

objcopy \
	--add-section .osrel="/etc/os-release" --change-section-vma .osrel=0x20000 \
	--add-section .cmdline="/root/kernelparams" --change-section-vma .cmdline=0x30000 \
	--add-section .linux="/boot/vmlinuz-lts" --change-section-vma .linux=0x40000 \
	--add-section .initrd="/tmp/initramfs-lts" --change-section-vma .initrd=0x3000000 \
	/usr/lib/gummiboot/linuxx64.efi.stub /boot/alpine.efi
This script will build our UKI with all of the necessary contents. If you placed your kernel parameter file elsewhere, do change the .cmdline="/root/kernelparams" line to point at your kernel parameter file.
If you chose not to include CPU microcode in your initramfs, point at the normal /boot/initramfs-lts file here instead of the one that would have been placed in /tmp/initramfs-lts if you included CPU microcode earlier.
To make this script executable, run chmod +x build-uki.sh and execute it with ./build-uki.sh.
Once the UKI has been generated, we can create a boot entry that points at it with efibootmgr.
Creating the boot entry
Install efibootmgr with apk add efibootmgr.
To create the boot entry, run the following command:
efibootmgr --create --label "Alpine Linux" --disk /dev/vda --part 1 --loader "\alpine.efi"
Be sure to replace /dev/vda according to your setup.
Finalizing
Assuming all went well, you should be able to boot into the new Alpine Linux install via the UKI.
If you would like to use secure boot, follow the instructions on my Secure Boot on Linux with sbctl post, signing only the UKI file we created in this post (/boot/alpine.efi).
If you would like, place all of the commands ran here into a single script to simplify this process.